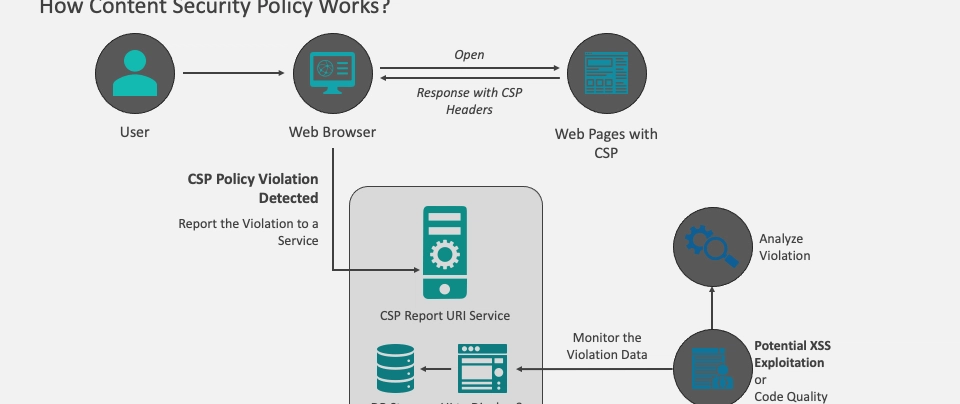
In today’s digital landscape, website security is non-negotiable. One of the most effective ways to defend against common attacks like Cross-Site Scripting (XSS) and data injection is by implementing a Content Security Policy (CSP). A CSP acts as a powerful gatekeeper, telling a user’s browser exactly what resources are allowed to load on your site. This simple, yet powerful, layer of defense can prevent malicious scripts from executing, even if an attacker manages to inject them.
So, how do you set up a CSP and make your site more secure? Let’s dive in.
Understanding the Basics of CSP
At its core, a CSP is a security standard that web developers can use to define a set of policies for their web pages. These policies tell the browser which sources are trusted for various types of content, such as scripts, stylesheets, images, and fonts.
A CSP is delivered to the browser either through an HTTP response header or a <meta> tag in your HTML. Using an HTTP header is the preferred method as it offers more control and security.
Key CSP Directives
The policy itself is a string of directives separated by semicolons. Each directive controls a specific type of resource. Here are some of the most common ones:
default-src: This is your fallback. It defines a default policy for most fetch directives if they are not explicitly specified.script-src: Defines valid sources for JavaScript files. This is your primary defense against XSS.style-src: Specifies the trusted sources for CSS stylesheets.img-src: Defines valid sources for images.font-src: Specifies allowed sources for fonts.connect-src: Controls which URLs the site can load usingXMLHttpRequest,fetch, or WebSockets.
A simple, strict CSP might look something like this:Content-Security-Policy: default-src 'self';
This policy tells the browser to only load resources (scripts, images, CSS, etc.) from the same origin as the document. Any external resources would be blocked.
A Step-by-Step Guide to Implementation
Implementing a CSP can seem daunting, but you can approach it systematically. The key is to start in “report-only” mode to test your policy without breaking your website.
Step 1: Define Your Initial Policy
First, you need to identify all the trusted sources your website uses. This includes your own domain, but also any third-party services like Google Analytics, CDNs, or embedded content.
A great way to start is with a strict policy and then incrementally add the sources you need. Let’s build a policy for a blog that uses Google Fonts and an external CDN for jQuery.
1 | default-src 'self'; |
Step 2: Use “Report-Only” Mode
Before enforcing your CSP, you should run it in a non-blocking “report-only” mode. This allows you to see what violations would occur without actually blocking any resources.
You do this by using the Content-Security-Policy-Report-Only header instead of Content-Security-Policy. You also need a report-uri or report-to directive to specify where the violation reports should be sent.
Let’s modify our previous example:
1 | Content-Security-Policy-Report-Only: default-src 'self'; script-src 'self' https://code.jquery.com; style-src 'self' https://fonts.googleapis.com; font-src 'self' https://fonts.gstatic.com; img-src 'self'; report-uri /csp-report-endpoint; |
With this header in place, your website will function normally, but your browser’s developer console will show any CSP violations. You can also monitor your report endpoint to see a comprehensive list of blocked resources, which will help you refine your policy.
Step 3: Implement the Policy
Once you have tested and fine-tuned your CSP, and you are confident that it won’t break your site, you can switch from Content-Security-Policy-Report-Only to Content-Security-Policy.
You will typically add this header in your web server’s configuration file (e.g., .htaccess for Apache, or the server block for Nginx).
Example for Apache’s .htaccess file:
1 | <IfModule mod_headers.c> |
Example for Nginx server block:
1 | add_header Content-Security-Policy "default-src 'self'; script-src 'self' https://code.jquery.com; style-src 'self' https://fonts.googleapis.com; font-src 'self' https://fonts.gstatic.com; img-src 'self';"; |
Step 4: Continuous Monitoring and Refinement
A CSP is not a “set it and forget it” solution. As you add new features or third-party integrations to your website, you’ll need to update your policy. Monitoring your CSP reports is crucial for maintaining security and ensuring your site continues to work as intended.
Check Your Work
After you’ve implemented your CSP, it’s a good practice to use an online tool to scan your website and confirm that the headers are set correctly.
Check Your CSP with this Free Web Scanner Online Tool
This tool will analyze your CSP headers, point out any potential weaknesses, and help you understand how to improve your policy.